
Direct Answer: Test on the back of the sample: drops of water at 5 and 30 minutes for absorption, cooking oil for staining, lemon juice for etching. Then repeat on a sealed corner.
The fear behind this question is almost always the same. You pick a material you love, the fabricator cuts it, it gets installed, and three months later there is a cloudy ring near the faucet or a dark spot where the olive oil bottle lived. By then, the decision is permanent.
That worry is why sample requests keep coming in. Roughly one in twenty website inquiries is someone asking for a piece to hold, and those requests come from Carmel and Pacific Grove, from Palo Alto and San Francisco, and from well outside California. People want the material in their own hands before they commit.
Here is the shift that makes all the difference: a take-home sample is a test piece, not a color chip. This guide walks you through the tests to run, in order, and what each result actually tells you about how the stone will behave in a working kitchen.
Start by treating the sample as a test piece, not a color chip
Most people take a sample home, prop it against the cabinets, look at it for a week, and bring it back. That tells you something about color. It tells you nothing about performance.
The useful work happens on the back or an edge of the sample, never the show face. You want to abuse a surface you will never look at again, so you can see what the material does under conditions it will actually face.
Before you start, set the piece up right:
- Wipe the back clean and let it dry fully, at least a few hours
- Work on a flat surface where the sample will not get bumped
- Keep a marker or piece of tape handy to label each test spot
- Leave one corner untouched so you have a dry reference point
- Plan for about 30 to 45 minutes of check-ins, not one quick look
The whole sequence takes an afternoon. Compare that to living with a countertop for fifteen years. If you want more background on what nobody explains up front, the piece on natural stone countertops and what nobody tells you covers the wider decision.
The three tests to run, in order
Run these one at a time, in separate spots, so results do not bleed into each other.
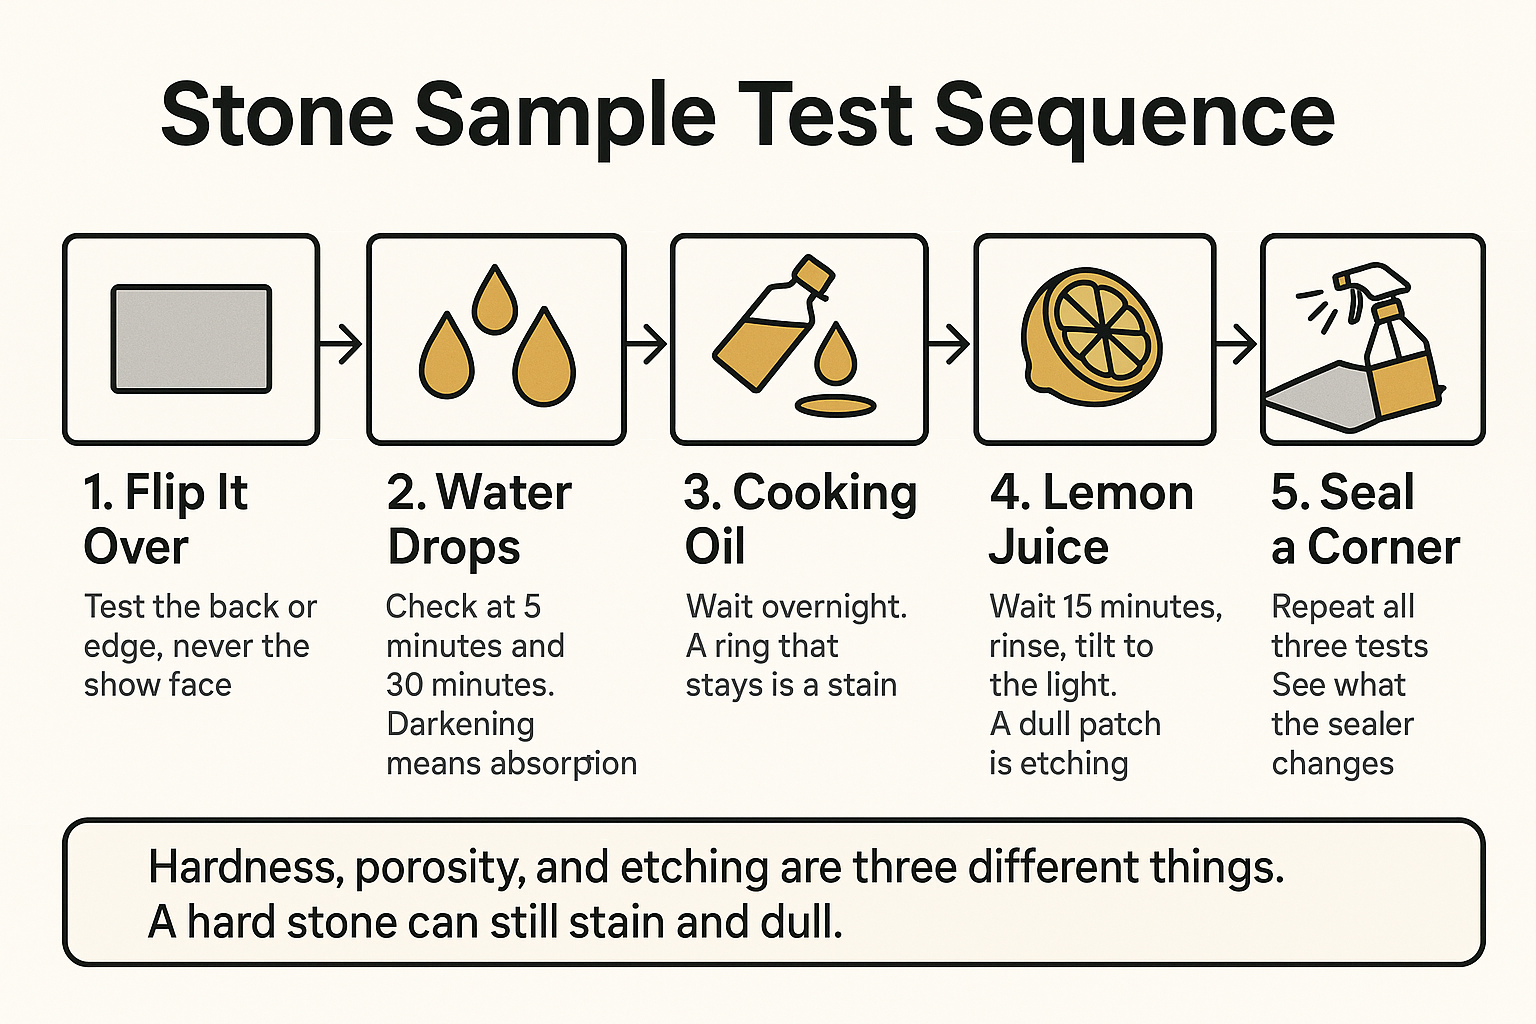
1. Water, checked twice. Put a few drops on the back of the sample. Look at 5 minutes, then again at 30 minutes. What you are watching for is darkening. If the stone takes on a dark wet halo quickly and holds it, the surface is drinking. A material that shows almost nothing at 30 minutes is dense and slow to absorb.
2. Cooking oil, as the worst case. Dab a small amount of mineral oil or olive oil in a different spot. Oil is the honest test because it is what actually ruins countertops: cooking splatter, salad dressing, a bottle set down and forgotten. Check it at 30 minutes and again the next morning. A ring that stays after cleaning is a real stain, not a water mark.
3. Lemon juice or white vinegar, for etching. One drop in a third spot. Wait 10 to 15 minutes, rinse, dry, then tilt the piece under a light. Etching does not change the color. It shows up as a dull, slightly rough patch where the shine used to be.
Then repeat all three tests on a corner you have sealed with a quality impregnating sealer, following the sealer’s own directions. That side-by-side is the single most useful thing a sample can show you, because it separates what a sealer fixes from what it does not.

Hardness, porosity, and etching are three different things
This is where most post-install disappointment starts. Homeowners get told a stone is hard, hear that as bulletproof, and then feel misled when marks show up anyway.
They are three separate properties:
- Hardness is scratch resistance. It says whether a knife or a dragged pot will leave a line.
- Porosity is absorption. It says whether liquids soak in and stain.
- Etching is a chemical reaction. It says whether acid dissolves a bit of the surface and dulls it.
A stone can be very hard and still stain. A stone can be dense and still etch. Quartzite is the material this trips up most often. It is genuinely tough, but many slabs sold as quartzite carry some calcite, and buyers who were told “quartzite cannot etch” find cloudy marks near the sink and the cooktop.
Anything calcite-heavy reacts to acid no matter how solid it feels. That includes marble, limestone, travertine, and dolomite. If you have been circling dolomite, the explainer on what dolomite stone actually is is worth ten minutes.
Absorption also varies slab to slab inside one material name. That is not a marketing dodge, it is geology. The stone industry measures it with a lab test, and ASTM C97 absorption testing from the Natural Stone Institute is treated as an indicator of stain resistance. Your kitchen-table water test is a rough stand-in for exactly that number.
What to expect from common materials
General tendencies only. Individual slabs vary, which is the whole reason you test the actual sample you were given.
| Material | Acid etching risk | Absorption tendency | What to watch on your sample |
|---|---|---|---|
| Marble | High | Moderate to high | Dull spot from lemon juice within minutes |
| Limestone | High | Moderate to high | Fast, dark water halo on the honed back |
| Travertine | High | High | Oil wicking into open pores and staying |
| Dolomite | Moderate to high | Low to moderate | Subtle etch that only shows in raking light |
| Quartzite | Low to moderate | Low | Etch near acid drop if calcite is present |
| Granite | Low | Low to moderate | Oil ring on lighter, more porous varieties |
| Onyx | High | Moderate | Both etching and staining; treat as delicate |
| Porcelain slab | None | Very low | Nothing from the liquids; check edges instead |
The sample test sequence at a glance
Print this or keep it on your phone while you run the tests at home.
Look at the sample in your own light, not the showroom’s
This is the step people skip, and it is free. A slab yard runs bright overhead lighting. Your kitchen does not.
Carry the sample home and set it in the actual room. Then look at it:
- Against the cabinet door or a painted cabinet sample
- Next to the floor material or a piece of the tile you chose
- Beside the paint chip you are considering for the walls
- In morning light, with the window uncovered
- Again at night, under whatever lighting is over the counter
A fogged-in Carmel or Pacific Grove morning drains warmth out of a stone that looked creamy in the showroom. A south-facing Palo Alto kitchen in the afternoon does the opposite and can push a cool white slab toward yellow.
One customer walked in carrying a painted cabinet sample, a piece of her tile floor, and a subway tile, and compared all of it at once against the slabs. That is the behavior that produces no regrets. If you want a fuller plan for the visit itself, read how to make the most of a stone showroom visit.
Be honest about what a sample cannot tell you
A four-inch piece is a performance test. It is not an appearance test, and confusing the two is how people end up unhappy with a stone that passed every liquid test.
A sample will not show you:
- Veining and how the pattern moves across a full slab
- The direction of the movement and where the busy areas fall
- How two slabs will read next to each other on an island and a backsplash
- Scale, which changes completely at six or nine feet wide
Natural stone varies even within the same quarry block, so two slabs cut from one block are cousins, not twins. One caller said it about as plainly as it can be said: he had seen the material on the website but was not sure it was what he needed.
So split the decision in two. The sample answers how will this behave. Standing in front of the full slab answers is this the one. Both need to happen, and picking a marble slab in person versus online gets into why the second one cannot be shortcut.
Test a sealed sample, because that is how the stone will actually live
Judging a material on bare-stone behavior is unfair to the material. Almost no natural stone countertop goes into service unsealed.
Robbie Robinson, founder of Carmel Stone Imports, makes the point that modern sealers and cleaners resist etching and staining far better than most homeowners assume, and that damage to natural stone can generally be restored. A honed marble that etches can be refinished. Engineered products do not repair the same way.
So when you run the tests, run them twice: once bare, once on a sealed corner. Then ask a specific question about the material you are considering, not stone in general:
- What sealing cadence does this material realistically need in a working kitchen?
- What about the same material in a powder room that sees light use?
- What daily cleaner is safe, and what should never touch it?
The answers change a lot between a limestone floor and a quartzite island. One cleaning professional wrote in asking what to use on limestone floors when a pH-neutral cleaner was not lifting built-up grime, which is exactly the kind of question worth asking before you buy, not after.
Frequently Asked Questions About Testing Stone Samples
Will testing ruin the sample?
If you test the back or an edge, no. The show face stays clean for color comparison. And an oil ring or etch mark on the reverse side is exactly the information you paid an afternoon to get.
My sample etched. Does that mean I should not use the stone?
Not automatically. It means you now know what the material does and can plan around it. Plenty of Monterey Peninsula kitchens run honed marble happily because the owner accepted a living finish going in. The problem is never etching itself, it is finding out about it after installation.
How long should I keep a take-home sample?
Long enough to see it in morning and evening light on at least three different days, and long enough for the oil test to sit overnight. A week is plenty for most people.
Can I test a porcelain or engineered quartz sample the same way?
You can, and you should expect it to shrug off all three liquids. The real questions with those materials are different: edge appearance, pattern repeat, and how the fabricator handles them. The overview on porcelain slab countertops covers what to ask instead.
Are samples available for everything?
For most materials, yes, at the Carmel and Palo Alto showrooms. For unusual imported lots, staff can often pull the specific lot your sample came from so you can see the full slab it belongs to when you are ready.
Want a sample in your hands before you decide?
Take-home samples are offered for most materials at the Carmel and Palo Alto showrooms, and staff can pull the specific lot a sample came from when you are ready to see the full slab. What customers tend to mention most is the patient, unhurried help, like one reviewer who noted the team “answering all our questions, sending samples, and arranging delivery of our large order.” If you are working on a Carmel, CA project and want to talk through a material, the team can be reached at (650) 800-7840 or info@carmelimports.com.